Archive for the ‘projects’ Category

A New Look & An Old Finish

What do you think about my updated look?  I liked the brown from before, but it was starting to feel too dark.  So I found this nice brighter theme.  I think it is much happier looking than the brown 🙂

If you haven’t noticed, I am really terrible about taking photos.  I know I need to get better about getting shots of all my projects, both finished & in progress.  But I am usually just too tired to mess with the camera, so most of the time, I don’t.  However, my best friend was kind enough to get an Action Shot of a mug rug that I made for her earlier this year.  I was supposed to have it done as a Christmas 2010 gift.  But that didn’t happen.  I did at least get it done & delivered before Christmas 2011 though!!

The mug was a previous gift, so I decided to try & stick with that theme for the new rug.  It took awhile to figure out what I was going to do, because I kept trying to figure out how to piece those cute rounded flowers into it.  Eventually I realized I could just go with the traditional Friendship Star & try to match the colors.  I think that worked out much better.  I still think those flowers would be super cute, so I may try that out someday.  But I am pleased with how this version turned out.  Here are all three together that I made for my work friends.

Argyle with mugSheep with mug

So this is not actually what I have been up to lately.  The things I need to take pictures of are – I started a new baby quilt & I finished the broomstick lace that I showed a progress picture of before.  I will try to make myself get photos soon, & I still need to layer, baste & quilt those letter quilts.  I will be happy to have those finished & on their way to my adorable baby cousins!!

What about you?  What have you been up to lately?

S&Y Green Turtle

A & J: Tops Done!

I didn’t get as far as I had wanted, but I did make real progress over the weekend.  Here are the completed tops for the A & J quilts.  The blue stands out a lot  better than the pink/purple does.  I’m hoping that the A shows up better once I’ve quilted them.

Baby A quilt top                   Baby J quilt top

Next on the A & J To Do list was a trip to Hobby Lobby with my 40% off coupon to get some batting.  Hopefully I’ll have time this week to get them layered & basted.  I plan for the quilting to outline the letters and then follow the grid outside the letters.  Once I have that finished, I’ll decided whether I want to add stars or something inside the letters themselves.  I have two Winnie The Pooh receiving blankets that I picked up at a church bazaar.  Those will be used for the backings.  Maybe I will even get these finished over the weekend!

In other news, the first BOM was posted this weekend.  I made my fabric selections today & I will post a picture once I get my block made.  I am excited about it.  For one thing, this is my very first BOM ever – & for another, I have a stash of fabrics some friends gave me for Christmas that I hadn’t figured out what to do with yet.  I think they will be perfect for this!

Canton Village Quilt Works

S&Y Green Turtle

Challenge Finish & A Fond Farewell

Goodbye, Leslie William Nielsen (Feb 11, 1956 – Nov 28, 2010)

Though he is most famous for his comedic roles in films such as Airplane! & The Naked Gun, I will forever remember him as the Heart Throb, leading man type. I will remember him as Captain John J Adams from Forbidden Planet, as Peter Brent in Tammy and the Bachelor, and as Charlie Telfer in Ransom!


Leslie Nielsen - Forbidden Planet
Forbidden Planet
Leslie Nielsen - Tammy and the Bachelor
Tammy and the Bachelor

I doubt most people my age have ever seen those, or noticed him in them. But in their younger years, I believe Leslie Nielsen was far better looking than Sean Connery, and I am sad to see him gone.

On a much happier note, today is the One Week Challenge link up. This past week was busy, busy with family gatherings & work. But I was able to meet my challenge goal and complete two of my needed three mug rugs! The first one started like this, during the November FNSI.

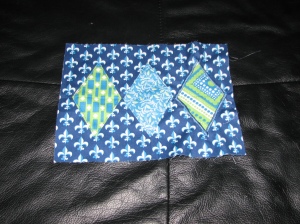
WIP mug rug

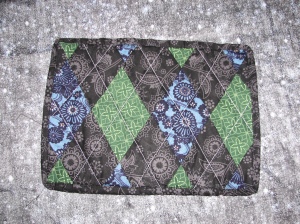
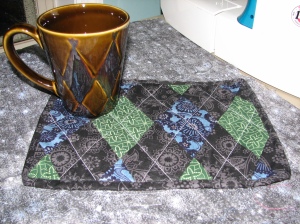
The idea was blue & green argyle. Honestly, the more I looked at that thing, the more I hated it. I think it may be the ugliest thing I’ve ever stitched together. So I scrapped it & bought new fabric FQs, in black, blue, green & light gray. Then I redesigned the mug rug to not use applique, and it turned out like this.

Argyle mug rug Argyle with mug

Once I’d bought the fabrics I went looking for the right mug, and I LOVE the one I found! I expected I’d just find something OKAY, and settle for whatever was available.  Instead, I found this great mug with diamond shapes on it to match the argyle.  The deep brown color goes nicely with the dark colors of the mug rug, but it’s so shiny, in most lighting it really just reflects the colors it sits on anyway!

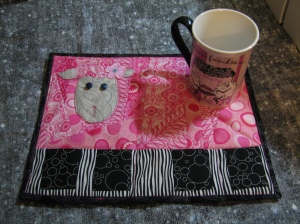
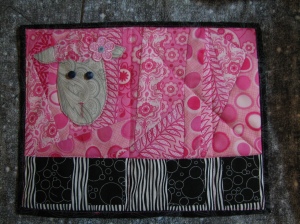
The second one actually started with the mug.  This friend loves all things pink, and I had stumbled upon this cute, pink, friendship mug depicting two sheep sitting at a cafe table. My first plan was to make the mug rug sheep shaped, with cloud like scallops, a cute sheep face and four little legs sticking out the bottom.  I knew I couldn’t bind that, so I made the sheep top, layered it inside out, stitched it up & turned it.  It was perfectly cute every step of the way… until I finished turning it right side out.  At that point, it showed puckers & bunched seams and it had short, scrawny, pitiful legs.  I was too aggrevated to photograph that version.

So… I flipped it back around, ripped a bunch of seams and started adding pink strips every-which-way I could.  That face was too cute and too much work to abandon.   I think the rectangle version turned out pretty cute when I was finished!

Pink Sheep Sheep with mug

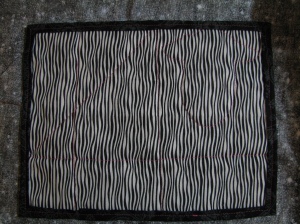
The “grass” around the legs is even cut up from the original “sheep-shaped” backing.  So I was able to salvage that too, which left enough in my scrap stash to still make the full backing from that same fabric.

Sheep back

Two down & One to go!  I’d like to get the last one finished this week.  But it’s more important that I make further progress on my “secret” proect.  It has to be done, washed, dried & wrapped by Christmas morning.  I estimate about 40 hours of work left on it.  But that’s an over-estimation (I hope) to make me keep on track and not procrastinate.  I’ve been taking photos, so I should be able to build a pretty decent post out of it, after Christmas.  Can you believe December starts on Wednesday!!??!

S&Y Green Turtle

FNSI & WIP

Friday Night Sew In was this weekend!  I actually participated, accomplished a bit & have taken photos!

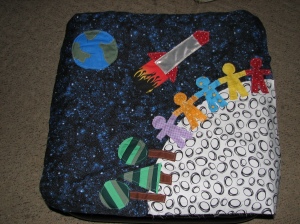
A friend and I have been working on submissions for the Dream Rocket project.  It has been fun to work on.  I think mine turned out pretty cute too.  I finished it last night during FNSI.

Dream Rocket

Once that was finished, I started work on my very first mug rug.  It’s for a friend at work as a Christmas gift.

WIP mug rug

I still need to satin stitch around two of the diamonds.  Then I’ll add some dotted lines crossing the diamonds to make it argyle.  Four of us took the day off and went shopping yesterday.  I think the friend I’m making this one for looked at every single argyle piece of clothing in every store we went in.  It was something we had in common.  🙂

So, I didn’t get a whole lot finished last night, but I’m pleased with the work so far.  Did you participate in the FNSI?  How did you do on your projects?

S&Y Green Turtle

Catching Up & Challenge Results!

There have been THREE weekends since my last blog posting!  That is too much time.  So here is an update of accomplishments from this past month.

Five day weekend was spent hanging out with my family.  We drove up to Ohio one day to visit the Air Force museum.  My son really wanted to see the SR-71 BlackBird. If you ever have the chance to go, you should make the trip.  It is free to get in, and they have a ton of flight & military history to absorb!

I didn’t do much sewing.  But my son & I worked on some Perler Bead projects.  I made these cute little boxes.  One is a puzzle cube and the other is just a gift box with lid.  They were a lot of fun to make!  I love Perler Beads  ♥ !

Here is a preview of part of my “secret” Christmas project!  I know you can’t really tell anything about it from looking at this photo.  So my “secret” is still safe!! I did most of this work over my five day weekend too.

Friday Night Sew In! I only partly participated this month.  Apparently we had some sort of bug at home that week.  I put the baby to bed Thursday evening around 8:30 or 9.  Then I went to bed myself & was completely passed out very soon after.  I slept, slept, slept until the alarm woke me Friday morning.  I was so excited for the FNSI, I bought snack & drink supplies to help keep me awake.  But by the time I got home, I was too tired to mess with any of it.  So after the kids were in bed, I put on my PJs, grabbed my crochet bag and climbed into bed myself.  My husband was very supportive.  He watched shows with me to help me stay up and at least work on something.  I had a list of about 7 projects I wanted to choose from – mostly sewing.  But I only worked on the one I could do in bed. 🙂  I did end up getting the last panel of the afghan nearly completed.  I’ll take & post a photo of the panels when I get the last one completed.

Once I get this panel finished, I will have five total, ready to put together.  Does anyone know any good tutorials showing different ways to crochet panels together?  Once I get this piece done, I will be making a couple small test panels to practice joining.  I’ll probably just make up different joining patterns until I find one I like.

I was not happy with my lack of progress, or lack of photography on Friday night, so I didn’t bother linking up on Saturday.  But I did actually work on something!

Today completes the October One Thing One Week Challenge, as hosted by Amy.  Here are the promised pictures of my September results.

You can tell I need a lot of work.  But overall, I was not terribly disappointed by my first attempt.

This week, I decided to work one of the projects I didn’t do for the Friday Night Sew In.  I made a “luggage tag” for my son’s band instrument.  The tag he was using is from a store where we were previously renting an instrument.  Since we no longer rent from them, we didn’t want to keep the store logo on his case, because we don’t want someone to think that’s where it should be returned if it gets lost.  ALSO, the other tag is just flat, with his information clearly visible on one side.  For safety reasons, I prefer the fold over style tags, that have to be opened in order to read the name.  That way, someone can’t just read it as he passes by, and then pretend to know him.  Here are my results!

Any guesses about which instrument he plays?

The Elvis version was my test run, since I didn’t really have a pattern exactly – just the ideas in my head.  It turned out pretty well, I think.  So I’m sending it to my grandmother, who enjoyed Elvis quite a lot.  So hooray for meeting my Challenge Goal this week!  You should go here and check out what everyone else has accomplished.

I had a LOT of fun making the luggage tags and I’m looking for an excuse to make some more.  SO – I’ve decided to do my very first giveaway!  Entering to win is simple.  Just leave me a comment on this blog post to let me know you’re interested.  In your comment, please give me a theme or color set idea so I can try to pick fabric you’ll like.  Make sure you have an email address available, so I can contact you if you win.  This will be the first time I’ve ever tried this, so I’m not sure about how the “No-Reply” stuff works between blog sites (i.e. between WordPress & Blogger).

So: Leave me a comment, with a theme or color scheme idea that you like.   Make sure I have access to your email address.  And on Wednesday, I will select a winner via Random.org (because that’s what all the cool kids use)

S&Y Green Turtle

Coffee, Despearate Housewives & a Challenge Finish!

Thanks to Terri’s post and her Autumn Spice Coffee, I decided to start my Saturday morning with some coffee of my own, and get some progress made on my One Week Challenge.  And guess what?  It worked!  I set up my computer on my sewing table to watch some episodes of Desperate Housewives (season 1), and I got my test sandwich done!  I didn’t watch the show when it started.  I thought it was just another soap opera for night time TV.  I recently found out it was more of a mystery show which caught my attention.  And it doesn’t hurt to know that Nathan Fillion shows up in a later season. ♥

Hopefully I’ll be able to post a picture of my test sandwich later today.  I wasn’t able to find my “real” camera this morning.  But I can use my cell phone later, if that’s all I’ve got.  I’m not ecstatic about the results of my quilting.  But I am happy enough for my first real attempt.  It ended up too big for a pot holder or trivet.  I might try to finish it as a place mat, but one side is Pink Panther fabric, so no one in my house will want to use it!  I had bought a bunch of that fabric for a potential project for a friend.  But I ended up only making a purse, so I still have some yardage left over.  My quilting was an attempt at the lovely rounded meandering paths that I see so often.  The path itself is fine, but you can definitely see places where the free motion foot & my machine were not getting along.  They seemed to dislike each other more & more as I progressed.  Or maybe they just didn’t like me…  I expected the unevenness of my stitching.  In fact, I think for the most part the stitch sizes are a lot more even than I thought I’d get on my first try.  But there are some half-inch stitches in there. 🙂  I changed my tension a few times during the process, and from looking at the results, I’d say that 7 or 8 is where I should probably keep it for quilting.  I wasn’t able to try it at full speed, because I had to fight the fabric so much to move around under the foot sometimes.  But sometimes it moved great.  I’m sure it’s something I’ll either get better at with practice, or I’ll learn to live with it until I get a machine that’s really intended to quilt with.

So my coffee was delicious, (Guatemalan Antigua with Swiss Miss, sugar & milk – yum!) my challenge was completed, & I started a new TV series I enjoy, which I can watch while sewing!  I’d call that a successful Saturday for me!

And since I had such success on Saturday, I’ve decided to try out the Friday Night Sew In for October.  The motivation will be good for me, and I love joining the giveaway drawings!

What about you?  Did you get your goals accomplished this weekend?  Anyone else want to join me for the FNSI on October 15th?  I think I may work that night on an afghan I’m making.  If I’m really focused, I bet I can finish the fifth & final panel for it that night.  Then I’ll just need to figure out how in the world to put them all together!

S&Y Green Turtle

I could use some suggestions

I can’t believe it’s been over a week since my last posting!!  Mostly that’s because I haven’t had time to work on anything lately.  I finally sat down this weekend and cut the strips for the next part of my “secret Christmas” project.   I’m really pleased with how it’s turning out, but I still can’t show pictures yet.

One interesting thing did happen this past week.  A good friend of mine owns a catering company & she has leased some shop space in her hometown.  She’s going to be running her company from the kitchen there, and she’s also going to open a small cafe & possibly a gift shop.  She’s hoping to sell locally crafted items, and is wanting me to provide her with some inventory.  I’m not entirely certain what to do about it.  While I would love to be able to make tons of money from making & selling my quilts, I know that won’t happen.  For one thing, I’ve heard it’s extremely difficult even for excellent quilters to make a living from selling their quilts.  For another, I am far from an excellent quilter.   I am happy making quilts for family & friends, but my current level of ability is not what I would be comfortable selling in a shop (YET).  I am, however, fairly happy with the quality of my baskets.   I would be okay with letting her sell some of those in her shop.  But I’ve only ever made six of them in my life.  I don’t know where I would find the time to make enough to sell.  So far, I’ve only ever made them during instructor led classes.   If I were to start making them for her shop, I guess I’d just fill my weekends with basket making.   I admit that I am slightly jealous of a lot of the crafty bloggers I read, who do not have to fit a standard 40 hour work week into their schedules.   I would love to be able to focus on kids & crafts all day, instead of just trying to cram them into evenings & weekends.  But on the other hand, if I didn’t have my job, I couldn’t afford my craft supplies anyway.  So it’s necessary.  And I am fortunate enough to at least have a job I enjoy – even if I would enjoy staying home with my family more. 🙂

I suppose I could also make little stationary sets for her to sell.  This one was an easy to make project, but I didn’t make the actual stationary that’s in it.

Okay, so now for a crafty question.  I have made a number of quilts, and my favorite part is the piecework, rather than the actual quilting.  Thus far, I have only ever used straight stitch quilting and I’ve had trouble with puckering on the backs.  (That is a seriously strange looking word.)  I have read that the best way to prevent that is to tape the backing to the floor, making sure it’s stretched tightly, then lay the batting & top over it…. & pin like crazy!  So that is my current plan for this secret project.  BUT, I’m not sure straight line stitching is appropriate in this case.  I’d *really* like to branch out a little and try some designs.  I can get stencils, if I decide to use someone else’s design.  Or I can create my own designs.  I haven’t really figured out exactly what designs I want to use for the quilting yet.  But what I’m having trouble with, in my experimenting, is getting a decent look from free-motion quilting.

I figured out how to get my feed dogs lowered, so they aren’t moving the fabric along.  And I purchased what I believe is a quilting foot for my machine.  But when I tried to practice with it, it just didn’t seem to work very well.  Is this something that you have any experience with?  Do you have any suggestions, tips or tricks on how to improve my free-motion quilting?  My machine is just a little Singer.  It doesn’t have room to twist full size blankets around under the arm.  So being able to move the fabric to follow the pattern in any direction (instead of just forward, with the walking foot) is essential if I want anything other than straight lines.   I am considering an alternative, if I can’t figure out free-motion by Christmas.  I have said in the past, that I don’t particularly like the look of tack & tie quilts.  However, if I can’t get the free-motion quilting to work, I may search out some very thin satin-ish ribbons in the appropriate colors.  Tiny satin bows would, I think, be very pretty in this case.  But I would prefer to have nicely quilted patterns instead.  Any ideas or suggestions?

S&Y Green Turtle

A-Tisket, A-Tasket, My Award Winning Basket!!

I’m super excited about this!  My son & I decided to enter our county fair this year.  He had been taking photographs while my grandparents were visiting this summer, & I recently found out that our fair is held over Labor Day weekend, so I talked him into entering some of his pictures.  It took us awhile to pare down the selection of photos, because we liked so many of them.  But eventually we helped him pick out four that we thought were the best for the categories available.  He entered two black & white, and two color.  He had also made a birdhouse as part of his summer reading project, so he entered that into the 4H woodworking category.  Since he was entering items, I decided I should probably be a good role model and enter some of my own work.  I hadn’t finished any new quilts lately.  The last ones I’d made all went to friends & family as baby gifts.  So instead, I decided to enter these.

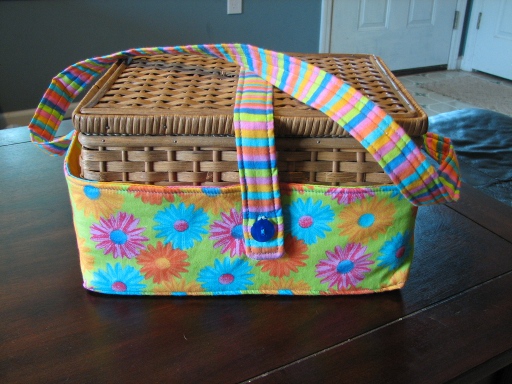
Basket Case Wildflower Basket with Braided Rim

The first is a carry case I made in order to keep & use my great-grandmother’s sewing kit.  It’s been handed down through the four generations, with most of her sewing accessories remaining in the kit.  Unfortunately, it’s lost the latch to keep the contents safe if it gets knocked over.  It’s also lost the carry handle to make it easier to haul around to sewing classes & retreats & such.  So I designed this cute & snug little carry bag that allows me to secure the lid with a button down strap, as well as to carry it around with a shoulder strap.  I had a few measurements to work with, but I mostly just lined the fabric up with the basket & marked the right lengths.

The second item, which was a last minute addition to my fair entries, is a basket I made at Craft Camp this year.  The design is called a Wildflower Basket, but I’m not sure who created it.  This class took all day.  From breakfast until lunch was spent building the basket part, which was slightly different due to the sloped sides.  From lunch until dinner (and beyond, in my case) was spent entirely on the braiding around the rim.  I made a lot of mistakes, but I learned a TON about how to correct my mistakes without tearing apart 6 hours of work 🙂

Last Monday we registered our items for judging, and this past Saturday we were able to go downtown for the parade, and to check out all the entries & winners.  I was amazed to find out that my basket had won Best In Show!!  I will try to update this post with a photo of the basket & ribbon after I pick them back up tomorrow.  My son also won ribbons.  His birdhouse & one photograph both received Third Place ribbons, while a separate photograph of his was awarded Second Place!!  So between the two of us, we had seven entries into the fair, & four of them earned ribbons.  🙂

Do you have local fairs where you live?  Have you ever entered one of your craft items?  I’ve always grown up with a local county fair, but this was the first time I’d ever submitted anything.  It was certainly a great first experience & we will definitely be looking around for next year’s entries-to-be!

S&Y Green Turtle

So maybe One Thing, Two Weeks?

You’d think it wouldn’t be so difficult.  I did not meet my challenge goal of getting the photos taken and uploaded to my site by Monday.  But I did manage to get it done today!  I still need to ask some of my family to photograph blankets I’ve made & gifted to them over the years.  But I’ve dug up the ones I still have around the house, & taken pics of those.  I’m about to add a couple photos to my previous blog & here is a preview of some upcoming topics!

I also organized my sewing area so everything is now on my shelves!  It still looks a little messy but organization is not one of my strong suits.  My organization style goes something like this…. Type A Items go Here, Type B go There, Types C & D go Here & Here…. Everything else goes wherever it fits.  Not a very effective way of organizing things, I know.  I think it’s a byproduct of having too much stuff, so I’m (sloooowlyyy) working on paring down my “beloved junk.”  Actually, I think taking photographs & posting them here will help with that.  Because I know I don’t want to show off my mess!

But now that my corner is set up so nicely, I have a bare spot on my wall, over the side of my sewing table.  My husband thinks it should remain bare.  But I am currently entertaining the idea that he may be wrong.  🙂

What do you think?  I don’t want to buy anything to put there.  But I’ve seen some nice mini quilt wall hangings.  I might want to create one just for this spot.  Or maybe, just some simple photography…. I’m not sure yet.  Does anyone have any thoughts on this?  Have you ever made a mini quilt for a wall hanging?  I’d love some tips & ideas!

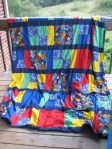
My first completed quilt

I had wanted to make a quilt for a long time, but hadn’t yet tried because I didn’t have any idea how to do the binding.  My mom & I were going on a weekend craft retreat, which immediately became an annual trip for us.  Many of my craft projects have come from those annual weekends. 🙂 One of the classes offered that year was a simple beginners quilt, so I signed up!

The supply list included twelve bandanas, a co-ordinating twin size top sheet, twin size batting & thread.  In class we sewed the bandanas together in a simple 3 x 4 grid.  I’d had a difficult time choosing colors at the store, so I’d bought a lot of extra bandanas.  I guess I thought I’d figure it out during class.  I had just as hard a time deciding in class as I did in the store. 🙂  I ended up using mainly navy blue, with a few dark green scattered in.

Once the top was made, we laid out our batting, added the sheet on top, then the bandanas on top of that, keeping bandanas & sheet right sides together.  We pinned the layers together, then trmmed the sheet & batting.  Next thing we did was to sew the layers together on three full sides & most of the fourth.  It sseems like I left about an eight inch gap.  We used the open gap to reach in & pull the quilt out, turning it right side out in the process.

After turning it, we top stitched around all four sides, closing the gap & making the edges nice & matched.  Well, mine really aren’t that even, but luckily for me, I’m not a perfectionist.  I also cut myself some extra slack since it was my first quilt.

I didn’t have time to finish in class, but the instructor said we could either quilt it later or tack & tie it with yarn.  Since I don’t much like the “tack & tie” yarn look, I brought it hope and added straight line stitching along all my seams…. & that was it!  My first quilt was finished!!

You probably noticed that at no point did I mention adding binding to the quilt.  It had occurred to me until then, that you could layer it inside-out, then stitch it & turn it for a binding free quilt.  The one step which had kept me from trying quilts on my own, turned out to be optional! 🙂

I made a few more turned quilts before I ventured on to self-binding.  I definitely thikn they look better with the binding.  But as a first quilt for someone like me, who was too afraid to get started for fear it would be too difficult to finish, the no binding, turn & stitch approach was perfect!

I gifted that first quilt to my husband.  He still uses it in his recliner.  Since my son wanted it, but didn’t get it, I promised him he could help me pick out the fabrics for *his* quilt.  That will probably be the topic of my next post.

I’d love to hear about your first quilt.  Or any other first time project you’ve done!